Watch our Most Recent Videos | Visit us on LinkedIn | Visit us on YouTube
What is the Destructive Testing?
The Destructive testing is accomplished by forcing the material to fail under various load factors. The destructive testing method is used to find mechanical properties of materials such as tensile strength, yield strength, hardness, impact toughness, elongation, etc.
The destructive testing for welding procedure qualification is discussed in the I4I Academy API 510 Pressure Vessel Inspector course, API 570 Piping Inspector course, and API 653 Aboveground Storage Tank Inspector course. The destructive testing for material certification is covered in I4I Academy ASME training course.
The method determines the point of failure of the material. This test is carried out under severe operational circumstances, and conditions are continual till the material breaks. The method of destructive testing ensures the reliability of material or mechanical part when subjected to the load. It also identifies whether the part or device produced encompass the required properties.
Destructive Testing – Tension Test
Tension test, also known as tensile test, is associated with the mechanical test of metal products subjected to a restrained load enough to bring to the rupture. The force applied is perpendicular to the cross-sectional area of the test item. Full section specimen will be tested in a 200 mm gage (8 in.) length. Four mechanical properties are determined from tension test:
- Yield Strength
- Tensile Strength
- Elongation
- Reduction of Area
Look at the following stress-strain curve:

The vertical axis shows stress and the horizontal axis indicates strain or change in dimension or indicates the increase of the length of the cylindrical test specimen. The point 1 is the yield point, it means if you pull a steel specimen near to the point 1 (stress level) the machine will record an increase in the length but as soon as you released the load it will be returned to the original length instantly.
This point is named yield point which a material change from elastic to plastic property (in tension machine) it means if you pass this point it will not return to the original length and you will experience a permanent deformation. The stress that you need to imply to a material to reach to point 1 is the yield strength.
If you pass point 1 and continue to pulling test specimen, you will have an increase in the length, but at the same time, you need to imply more load. Ultimately, you will reach the point 2 with the maximum deformation (increase in the length of test specimen), and the test specimen will start to the necking, this is the point 2 and is named tensile strength.
Any engineered material has a certain min yield strength and tensile strength at room temperature. These values were obtained from above mentioned tests. For example, the typical pressure vessel plate SA 516 Gr 70 has a minimum yield strength of 38, 000 PSI (Point 1 in above curve) and minimum tensile strength of 70, 000 PSI (Point 2 in above curve).
These values are for testing at the room temperature; obviously, if you increase the temperature, these values will be reduced since material gets softer when subjected to the higher temperature.
The tension test machine will measure the applied load, if you divide the applied load to the cross section area, you can calculate the yield strength amount. For instance, if you have a rectangular solid bar with 1 inch x 2 inch dimension and the tension test machine records yield point load as 60,000 Ib, then your yield strength will be 60, 000 /(1 x 2) = 30, 000 psi
Similarly, the machine will calculate the tensile strength (by dividing amount of load to the cross section area)
Destructive Test - Elongation
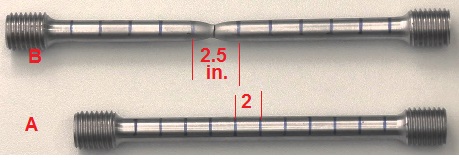
The length between each two line in following tensile test specimen is 2 inch. After completion of the test, you can put the separated part together and measure the length between two lines. As you see, the length after the test is 2.5 inch. It means your elongation of this test was (2.5-2.0)/2.0 = 25%
Similarly, you can calculate “reduction in area” percentage by A1-A2/ A1. The A1 is the cross section area before the test, and the A2 is the broken surface area.
Both elongation and reduction in area values indicate the degree of ductility and machinability.
Bend Test
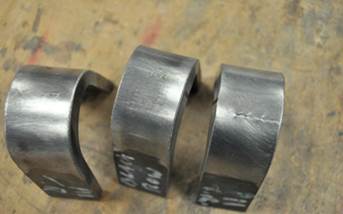
The qualitative ductility of material is determined by using bend test. In bend test, the specimen is bent over a specified diameter to a specified angle for a specific amount of time. After bending, the stressed side of bend test specimen is checked and verified.
If no crack observed it indicates that the material had a good ductility, propagation a major crack on the bent side shows that the material lacked adequate ductility. The ASTM E290 provides the test procedure for bend test.
Impact Test

Why are we doing impact test? The material property changes from ductile to brittle in the certain temperature, as you decrease your services temperature, your ductility will be decreased, and your tensile strength will be increased. Reduction in ductility means your risk for brittle fracture will be higher.
If you drop a plain carbon steel 10 in. by 10 in. Plate from 6 feets height to concrete floor, you will only hear an impact noise and nothing more, but if you place this plate in laboratory freezer and cooled it down to the -100 degree F and then drop it, probably it will hit the floor and breaks to the several pieces.
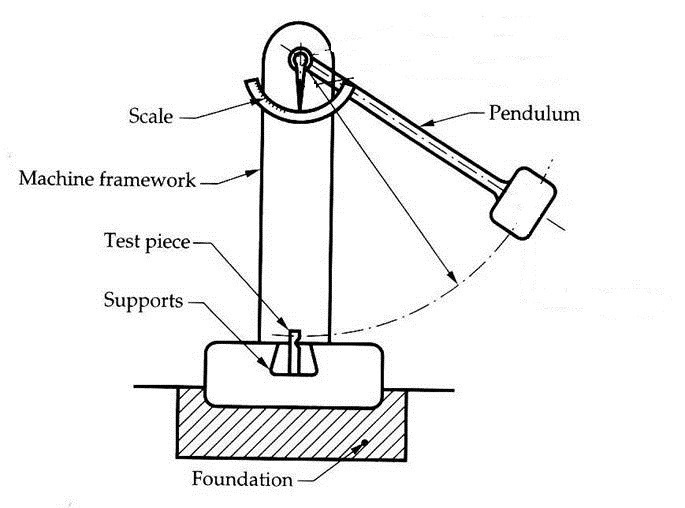
We are doing impact test, to make sure our material will be safe in the minimum metal design temperature. One of the most common impact tests is a notched bar impact test called the Charpy impact test.
The Charpy impact test is a destructive test and uses a pendulum-type single-blow impact test where the specimen is secured at both ends and will be break by a falling pendulum. The energy absorbed, as determined by the subsequent rise of the pendulum, is a measure of the impact strength or notch toughness of material. The tests results are usually recorded in foot-pounds.
Look at the following picture, the pendulum hits the test specimen (the test specimen removed from freezer just before the test) and breaks it and rises, if rises remarkably, it indicates that the test specimen received a little energy to break it. In the same test, if rises a little, it shows that the pendulum spent lots of energy to break the test specimen.
ASTM A370 provides procedure and direction for conducting destructive testing. In some cases, refers you to different ASTM standards.
Free newsletter!
Sign up to receive my monthly newsletter covering all the latest courses and updates.
FIND US HERE:


Copyright © 2012-2024 Inspection 4 Industry LLC
Contact Inspection 4 Industry by Email
Contact by Phone - 949-383-0564