Watch our Most Recent Videos | Visit us on LinkedIn | Visit us on YouTube
Pressure Vessel Dimension Inspection
The Pressure Vessel Dimension Inspection article provides you with information about the dimensional requirements in pressure vessel construction and pressure vessel inspection.
The I4I Academy's Source Inspection for fixed equipment course comprehensively covers the inspection of Pressure Vessel Dimensions. Another relevant training program is offered in the I4I Academy ASME Training course, which encompasses ASME Section VIII Div.1, IX, and V. The ASME Section VIII Div.1 specifically addresses the dimensional inspection aspect within this training course.
You may know some fabrication tolerances have not been addressed in ASME Code Section VIII.
So you need to refer to other sources for inspection. This article provides you the most important dimensional inspection requirements.
The dimensional check of a pressure vessel consists of the following items:
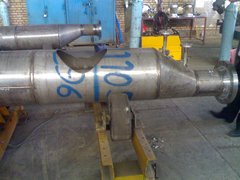
- Mill Undertolerance of Plates and Pipes
- Tolerances for Formed Heads
- Out of Roundness of shell
- Nozzles and attachments Orientation
- Nozzles and attachments Projection
- Nozzles and attachments elevation
- Nozzles and attachments levelness
- Weld mismatch
- Weld reinforcement
Mill Undertolerance of Plates and Pipes - Pressure Vessel Dimension Inspection Plate
Your pressure vessel plates with 0.01 inch or 6% undertolerance, whichever is smaller, may be used for full design pressure, instead of at the given design thickness specified.
However, if the material specification allows greater undertolerance, then the ordered thickness for the material should be sufficiently greater.
For example, if you have SA 516 Gr.70 plate with a 0.625 inch nominal thickness, and the actual thickness is 0.615, it is acceptable, and you may use this plate without any specific design consideration.
The ASME Training Course is 5 days video training course and available online and the student that successfully pass the exam, receive I4I academy certificate with 40 hours training credit.
But if the same plate has an actual thickness of 0.595 inches, you need to consider mill undertolarence in your design calculation.
This plate thickness is acceptable based on the material specification (see table in SA 20 for thickness tolerances). We cannot reject this plate because it is in the permissible tolerance of plate specification, but based on ASME Code SEC VIII Div 1, you need to consider this 0.03 inches in your design calculation: e.g. Thickness = Min Thickness + Corrosion Allowance + Mill Undertolrance
Pressure Vessel Dimension Inspection - Pipe
Contrary to the plate material, your pipe and tube mill undertolrances need to be taken into account for design consideration.
Pipe and tube undertolrances are almost -12.5 % of the nominal wall thickness, but sometimes there are differences for different materials, so for any specific material, it shall be referred to the suggested pipe or tube material specification to obtain the exact amount of mill undertolrances.
For example, if there is a pressure vessel with nominal shell thickness of 0.5 inch, it needs a 6” SA 106 Gr.B nozzle to be attached to the shell plate.
Assume that external loading is not a design controlling factor (is not governor), so as our minimum, nozzle thickness will be the same as the shell thickness.
So with a consideration of -12.5%, the calculation will be: 0.5 / 0.875 = 0.571 inches. So when we refer to ASME B36.10 and select our pipe schedule it will be SA 106 Gr.B Schedule 160.

Pressure Vessel Dimension Inspection - Tolerances for Formed Head
You may know that there is a specific rule for dimensional checking of formed heads, based the fact that the UG-81 inner surface shall not deviate outside of the specified shape more than 11⁄4% of D and inside the shape more than 5⁄8%.
You can use sweep boards, which are made by cutting a thin steel sheet or piece of wood for checking your crown and knuckle radius.
For your skirt, the difference between the maximum and minimum inside diameter, should not be more than 1%, and you can use a tape measure or laser measure for dimensional control of the skirt.
So to fully understand, let's check the following head together:
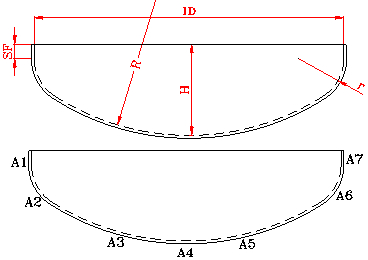
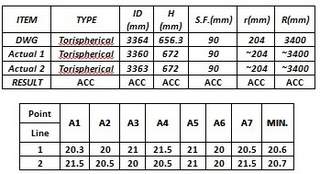
Head ID = 3364 mm
Head Type: Torispherical
Limit for Outside of specified Shape = 3364 x 1 ¼% = 42.05 mm
Limit for Inside of specified Shape = 3364 x 5/8 % = 21.025 mm
So we check the depth, and the drawing is 656.3 mm and the actual is 672 mm, so it is outside of the shape. We need to check if it is in the range of tolerance, so the maximum outside of the shape will be 42.05 + 656.3 = 698.35 so our actual value is 672 mm. 672<698.35, so it is OK.
We cut a sweep board equal to the head drawing crown radius (3400 mm) and other one for the knuckle radius equal to 204 mm, so we try to fit the sweep boards in the heads for the above example of the sweep boards. The edge distance to the head surface should not be deviate from the above limited values.
Skirt max and min ID should not be more than 1% of the ID, which is 33.64 mm. So, in the above example skirt is also is OK. Our nominal thickness is 20 mm, so up to 19.746 is acceptable then for the above example. The thickness dimension is also OK.
So the above head dimensions are ok
Pressure Vessel Dimension Inspection - Out of Roundness of Shell
UG-80 deals with out of roundness of shell. The maximum permitted ovality tolerance (D max – D min) shall not exceed 1% of the nominal diameter of the vessel.
If you have an opening, then the tolerance can be increased by 2% x d (d = diameter of opening), if the measurement is taken within a distance of ‘d’ from the axis of the opening.
The out of roundness generally is measured in two directions with a normal measuring tape or laser measure, so one direction would be the D max and other one would be the D min.
The following picture shows an out of roundness measurement:

Pressure Vessel Dimension Inspection - Nozzles and Attachments Orientation
ASME Code SEC VIII Div 1 has not specified the orientation tolerances for nozzles and attachments, so you need refer to the pressure vessel handbook.
It is almost +/- 1 degree. The orientation check can be done by a simple calculation by using a measuring tape in the actual measurement work on the vessel.
For example, we want to check N3 orientation in following drawing.

N3 is located at 120 degrees in the drawing. The manufacturer has located this point in the vessel with a marker, and we want to check the location, and if it is OK, then we can allow the manufacturer to cut.
So we run this simple calculation:
Vessel OD = 97.875”
Shell outside Circumference length = π x OD = 3.14 x 97.875 = 307.3275”
307.3275 distributed to 360 degrees so each degree represents
307.3275/ 360 =0.8536”
N3 is located at the 120 degree position, so if we use a measuring tape and keep 0 at the zero reference point in the vessel and pull the tape, the nozzle center should be located at 120 x 0.8536 = 102.4425 inches.
This 102.4425 is a perfect case so our tolerance is ±1 degrees. So if the tape shows in following range, it will be OK.
102.4425 – 0.8536 =101.5889”
102.4425 + 0.8536 =103.2961”
Pressure Vessel Dimension Inspection - Nozzles and Attachments Projection
Nozzle and attachment projection is the length from the nozzle or the attachment face to the vessel shell centerline.
Projection dimensions are addressed in general assembly drawings. The projection tolerances are not addressed in ASME Code SEC VIII Div 1, but if you refer to the pressure vessel handbook, almost ± 0.25 of an inch is permissible.
In following figure, we need to check the BD nozzle projection. It should be 660 mm in distance from shell centerline to the flange face.
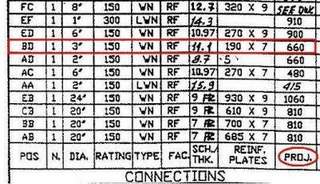
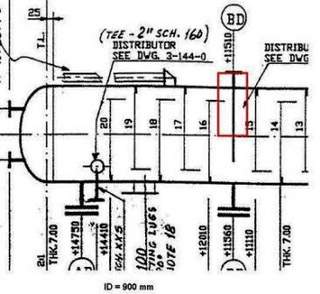
In practical measurement, you may use a measuring tape to measure the distance between the shell outside circumference to the nozzle face. Then the measured value is summed with the shell thickness and the inside radius. So for the above example, the following range is acceptable:
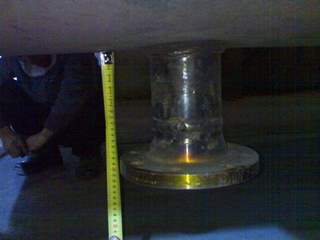
660 – 6.35 = 653.65
660 + 6.35 =666.35
Pressure Vessel Dimension Inspection - Nozzles and Attachments Elevation
Your Nozzles and attachments elevation is the length between the nozzles or the attachments centerline and the bottom or top head tangent line.
The elevation dimension is addressed directly in the general assembly drawing. The elevation tolerances are not addressed in ASME Code SEC VIII Div 1, but if you refer to the pressure vessel handbook, almost ±0.25 inch is permissible.
In following figure, we need to check Nozzle EB elevation. As you see in the drawing, the distance between the nozzle centerline to the bottom head tangent line is 700 mm.
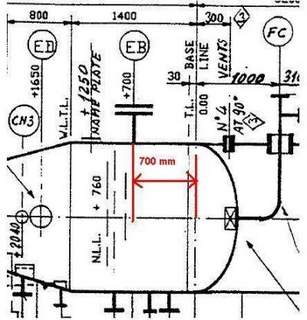
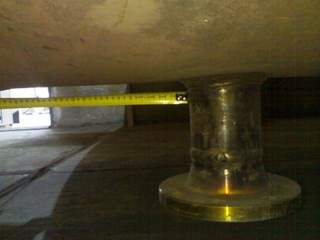
In actual measurement, the measuring tape or laser measure is used to measure from the nozzle neck center line to the tangent line. In this example, the following range is acceptable:
700 – 6.35 = 693.65
700 + 6.35 = 706.35
Pressure Vessel Dimension Inspection - Nozzles and Attachments Levelness
The nozzles and attachments levelness tolerances are not addressed in ASME Code SEC VIII Div 1, but in the pressure vessel handbook, a ½ ˚ deflection is permissible.
For levelness checking, a level gage is used. If the bubble is in the middle of the designated lines, the nozzle is level.
But if the bubble intersects the designated limit lines, you need to run a simple calculation and see if your deflection is within the tolerance limit.
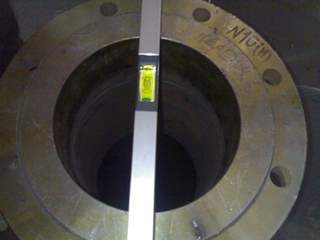
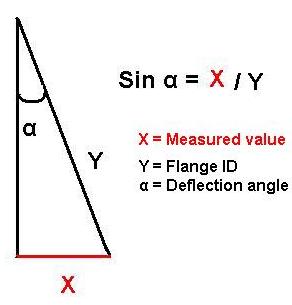
You need to move one end of the level gage up to the bubble to be placed in middle. Then measure the distance between the level gage end and the flange face. The measured value is the X in the figure.
Then obtain α, if α is less than 0.5˚, the deflection falls within the tolerances. And it is OK otherwise it will require cutting out and re-welding.
Pressure Vessel Dimension Inspection - Weld Mismatch
ASME Code SEC VIII Div. 1 specified tolerances for weld mismatch in UW-33. It is important to know that the limit for weld mismatch is stringent for a category A weld (Longitudinal joint and circumferential shell to hemispherical head).
The concept behind this is that the longitudinal joint bears double the amount of stress, and inspectors should precisely check these joints.
For example, you have a pressure vessel with a nominal thickness of 1 inch. You do a visual and measure the mismatch by the welding gauge. Assume you found a 0.143 inch mismatch in one longitudinal and one circumferential joint.
So you look to the UW-33 table:
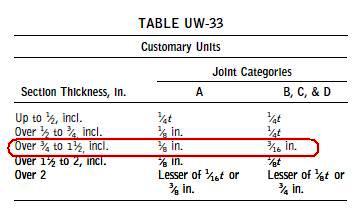
The permissible weld mismatch in the longitudinal joint for your case is 0.125 of an inch, and for the circumferential joint, it is 0.1875 of an inch.
Your weld mismatches for both longitudinal and circumferential joints are 0.143, so your circumferential joint is OK, but your longitudinal joint should be repaired.
Pressure Vessel Dimension Inspection - Weld Reinforcement
The same concept for weld mismatch exists for weld reinforcement tolerances. The longitudinal joint weld reinforcement limit is more stringent than that for circumferential joints.
This is because longitudinal joint bears double stress, and it is required that the stress concentration is minimized.
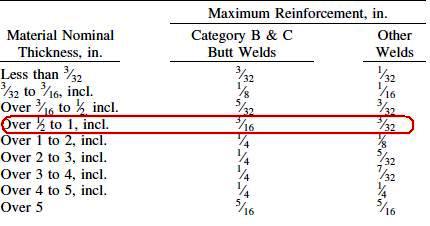
In the same example, assume that there are 0.150 of an inch welds reinforcement for both category A and B welds. Do you want to review your weld acceptance?
Category A allowances = 0.093 inch
Category B allowances = 0.1875
So our circumferential joint is OK, but the longitudinal is not OK and should be repaired by removing the excess weld reinforcement.
Free newsletter!
Sign up to receive my monthly newsletter covering all the latest courses and updates.


